Top 4 Resources inside T-Shirt Design Master Collection

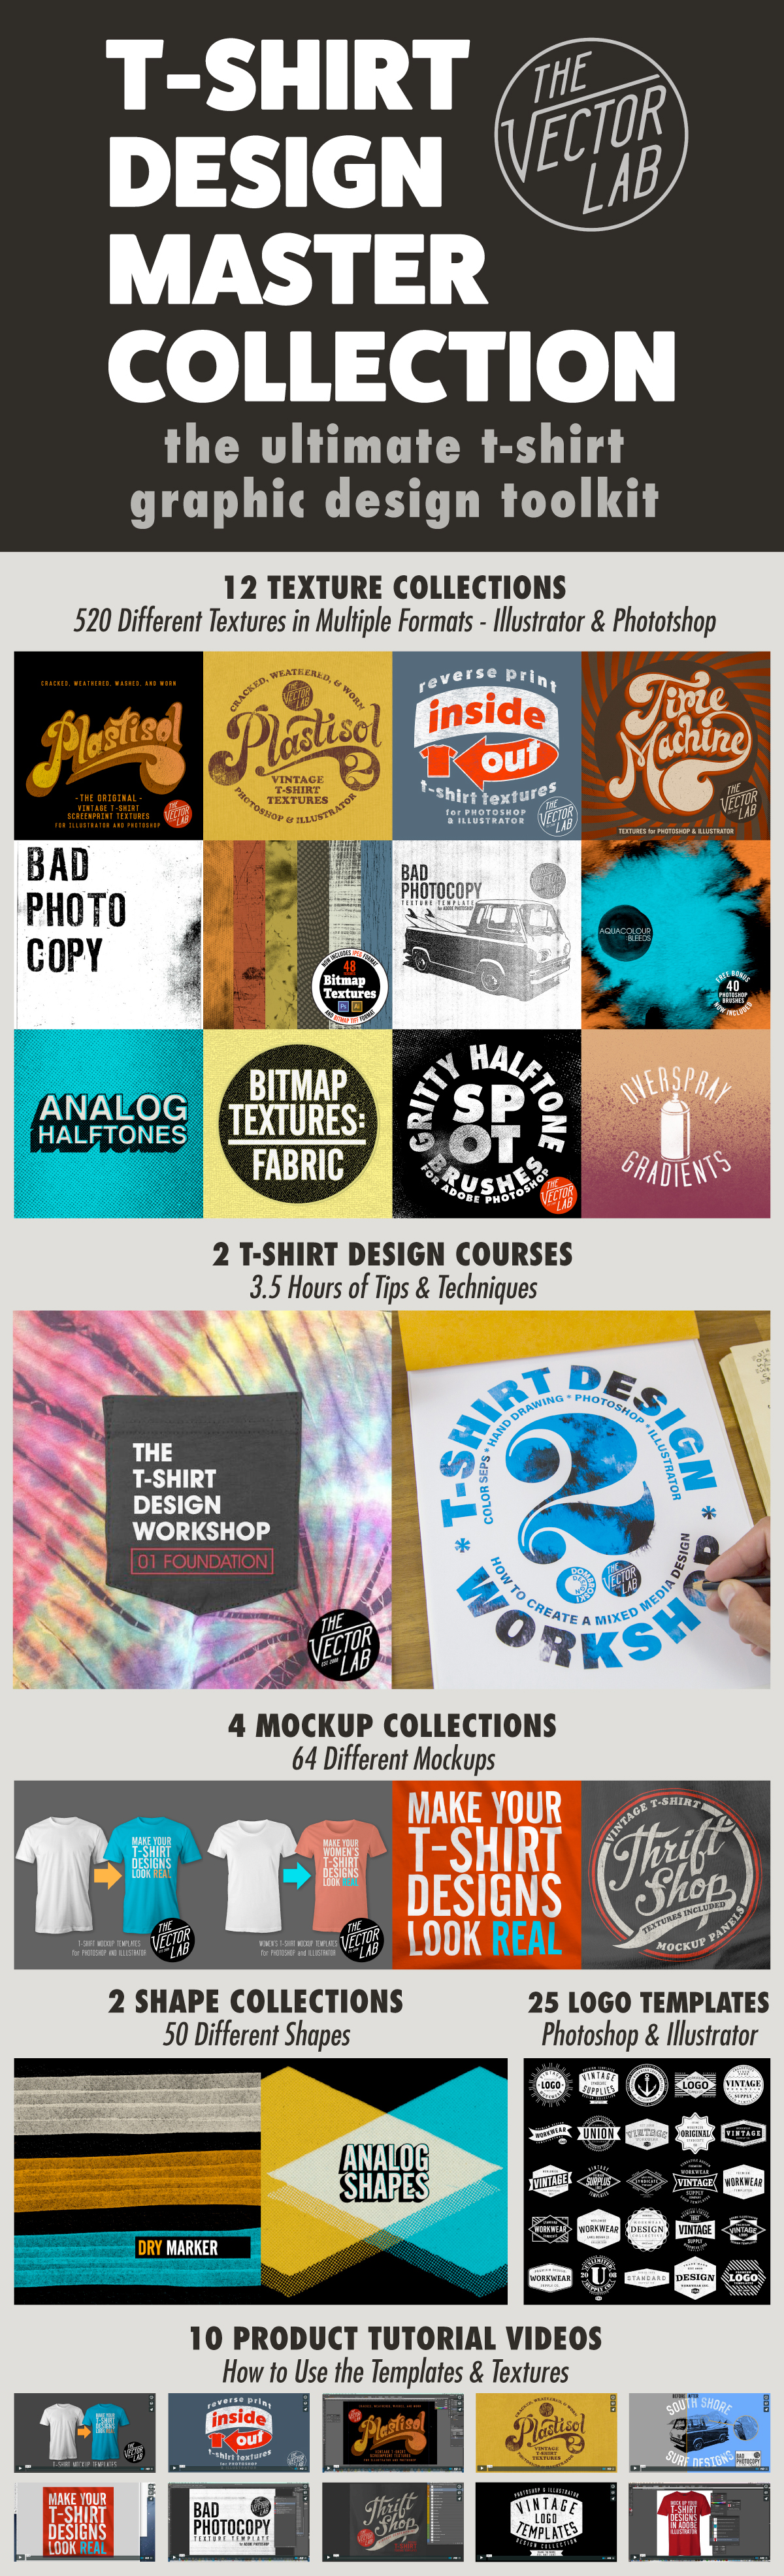
The T-Shirt Design Master Collection is my largest bundle of t-shirt design resources: 64 t-shirt mockup templates, 605 textures for Photoshop and Illustrator, 25 logo templates, as well as T-Shirt Design Workshops 1 & 2.

My favorite resources are:

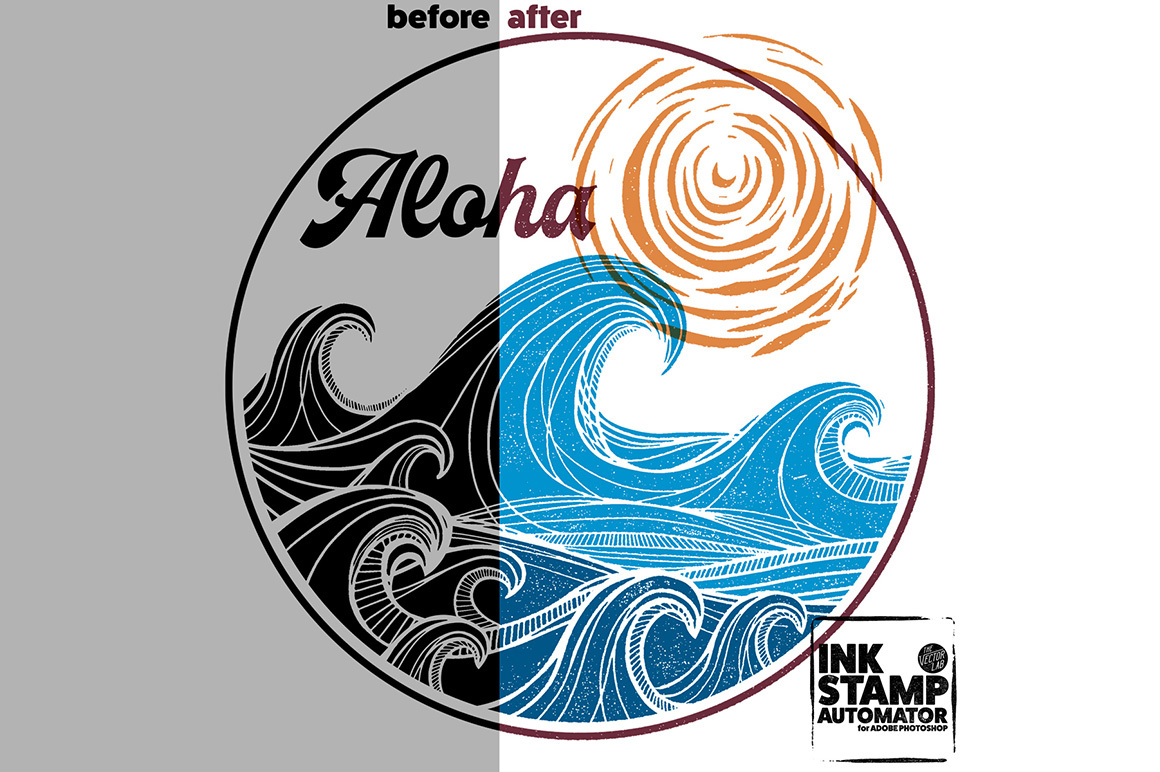
4) Ink Stamp Automator for Photoshop

Just copy & paste your design into this template to apply an instant ink stamp effect. Perfect for adding some interest to otherwise plain & simple logos or lettering.

3) Plastisol 1 & Plastisol 2 Vintage T-Shirt Textures

These cracked ink "Plastisol" textures will make your t-shirt graphics look washed & worn like and old vintage tee. Plastisol textures are ideal to add a "thrift shop" look to your real-life t-shirt screen print designs, as well as your digital portfolio. Photoshop and Illustrator compatible.

2) Men's T-Shirt Mockup Templates & Women's T-Shirt Mockup Templates

Making your t-shirt designs look real is the best way to show your designs before sending them off to be printed. These templates will help your clients and customers visualize your designs. You can even change the fabric color, add a custom neck label, and warp your graphic to match the wrinkles in the fabric. These templates are formatted for Photoshop and Illustrator, but also work with CorelDraw and Affinity Designer & Affinity Photo.

1) T-Shirt Design Workshop 1 & T-Shirt Design Workshop 2

Learn how to design a t-shirt like a pro. More than 3.5 hours of t-shirt design theory & instruction

Halftone Automator

Halftone Automator (a "smart PSD" template for Photoshop) will add vintage-style halftone effects to your designs, logos, and typography.

This template takes plain designs and instantly knocks a transparent halftone pattern right through your design.

How Halftone Automator Works:

1) Just paste in your Pixel or Vector design to the designated Smart Object layer.
2) Choose from 47 different halftone patterns, then you are done!

What's included:

  • The Halftone Automator Photoshop PSD template (4000 x 4000 pixels).

  • 47 built-in halftone patterns with various dot sizes and density.

  • Quick Start Guide PDF instructions.

The effect works best if you paste in a design that is on a transparent background. See video with tips on how to adjust the halftone effect that is applied.

Ink Stamp Automator

Recently, I created a new texture template for Photoshop to save time applying texture to logos, lettering, and t-shirt designs. It's something I've been using in my own freelance design work. And it’s a big time saver.

This new template is called the Ink Stamp Automator.

This template allows you to apply an instant Ink Stamp (or woodblock / linocut print) look to your designs in Photoshop.

Even if you aren't specifically looking for an ink stamp look, it's a great way to add some interest and texture to your designs.

Go here to see some examples of what you can do:

How Ink Stamp Automator Works:

1) Just paste in your Pixel or Vector design to the designated Smart Object layer.
2) Choose from 42 different ink stamp textures, then you are done!

What's included:

  • The Ink Stamp Automator Photoshop PSD template (4000 x 4000 pixels). 42 built in textures.

  • Quick Start Guide PDF instructions.

  • 9 Ink Stamp Shapes. These are ink stamp circles, squares, and rectangles that will help you create logo shapes (see video).

  • 42 stand alone ink stamp textures in LAYERED TIFF format (4000 x 4000 pixels). Perfect for power users who want to dig in and fine-tune the textures.

  • 42 stand alone ink stamp textures in BITMAP TIFF format (12,000 x 12,000 pixels). These are great for designers who want to use the textures in Adobe Illustrator.

Distressed Border Automator

When you are printing rectangular photos or illustrations onto t-shirts or posters, a crisp clean edge can be a bit too plain. 

With the Distressed Border Automator, you can quickly apply a transparent textured border to your t-shirt designs, poster designs, photos, and illustrations.

As shown in the video below, here's how it works:

  1. Paste your image into the Distressed Border Automator (Smart PSD Photoshop file).

  2. Choose from 24 transparent border designs.

  3. Or choose from 14 opaque border designs & apply any color to the border.

  4. Color your background or leave it transparent. Save or export your new image, then you are done!

This template is perfect for setting up your designs to be printed Direct To Garment (DTG) and Print-on-Demand with vendors like Merch by Amazon. As shown in the video below, just turn off the visibility of the background color layer. Export the file as a transparent PNG, and you are ready to send your design out for DTG printing!