Ink Stamp Automator

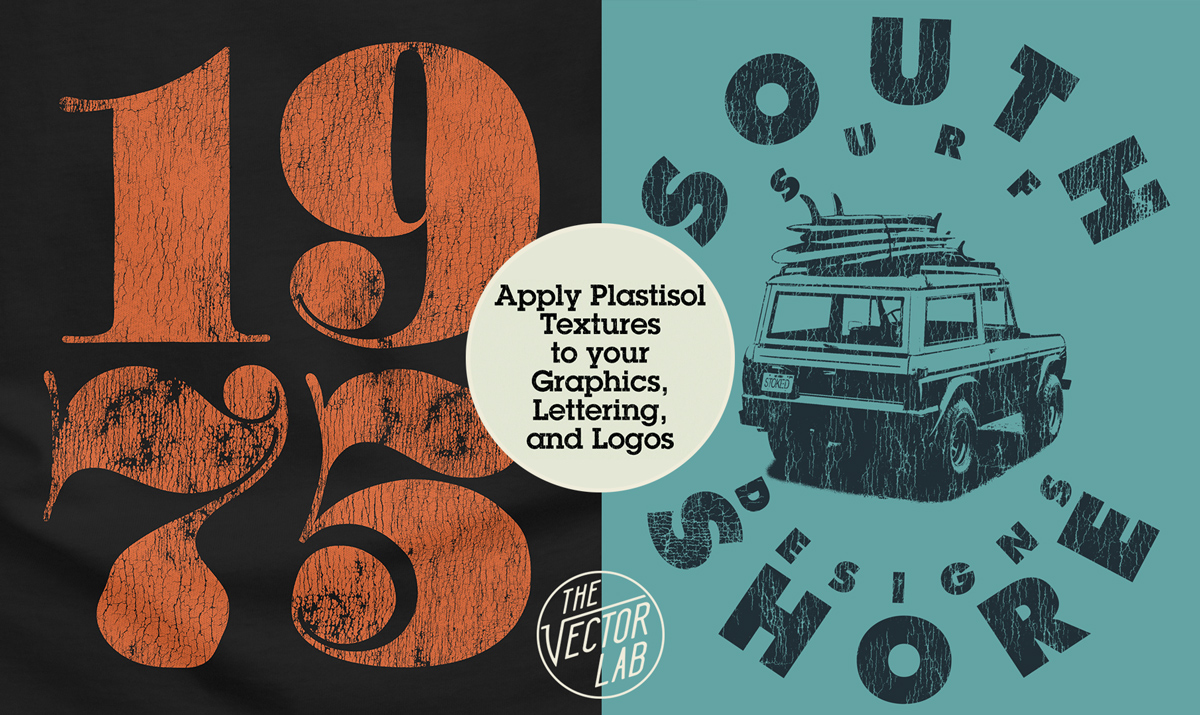
Recently, I created a new texture template for Photoshop to save time applying texture to logos, lettering, and t-shirt designs. It's something I've been using in my own freelance design work. And it’s a big time saver.

This new template is called the Ink Stamp Automator.

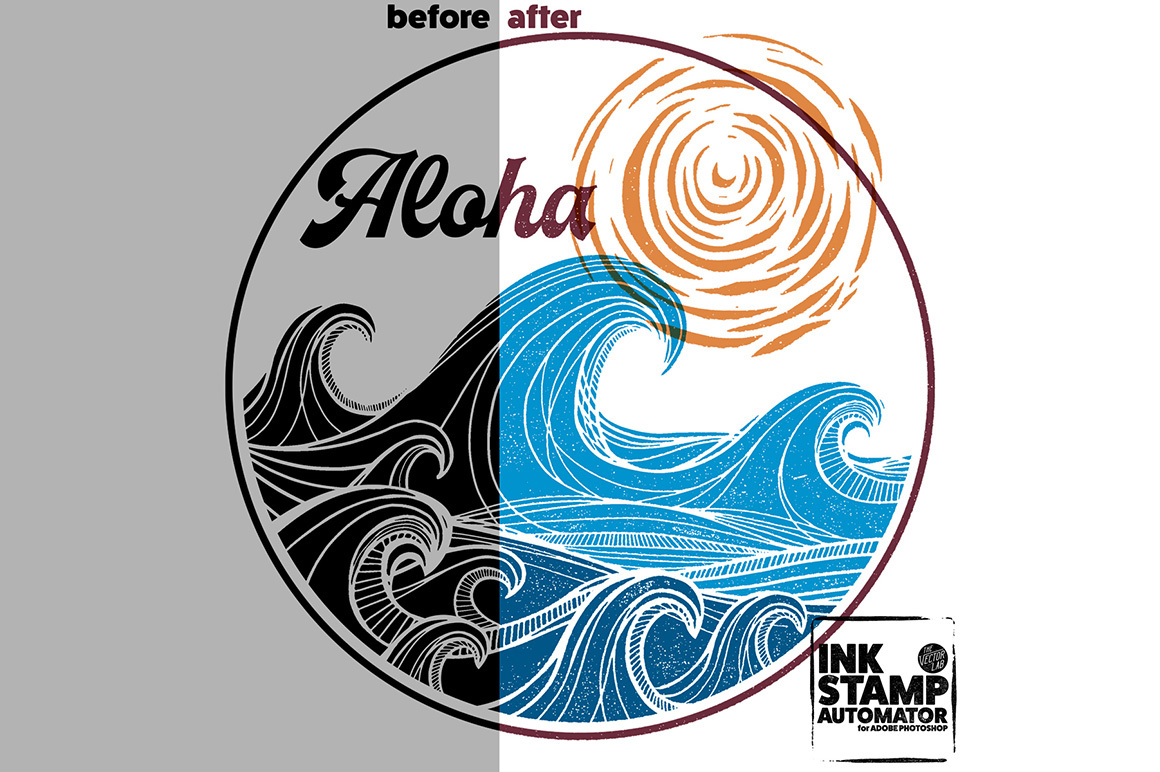
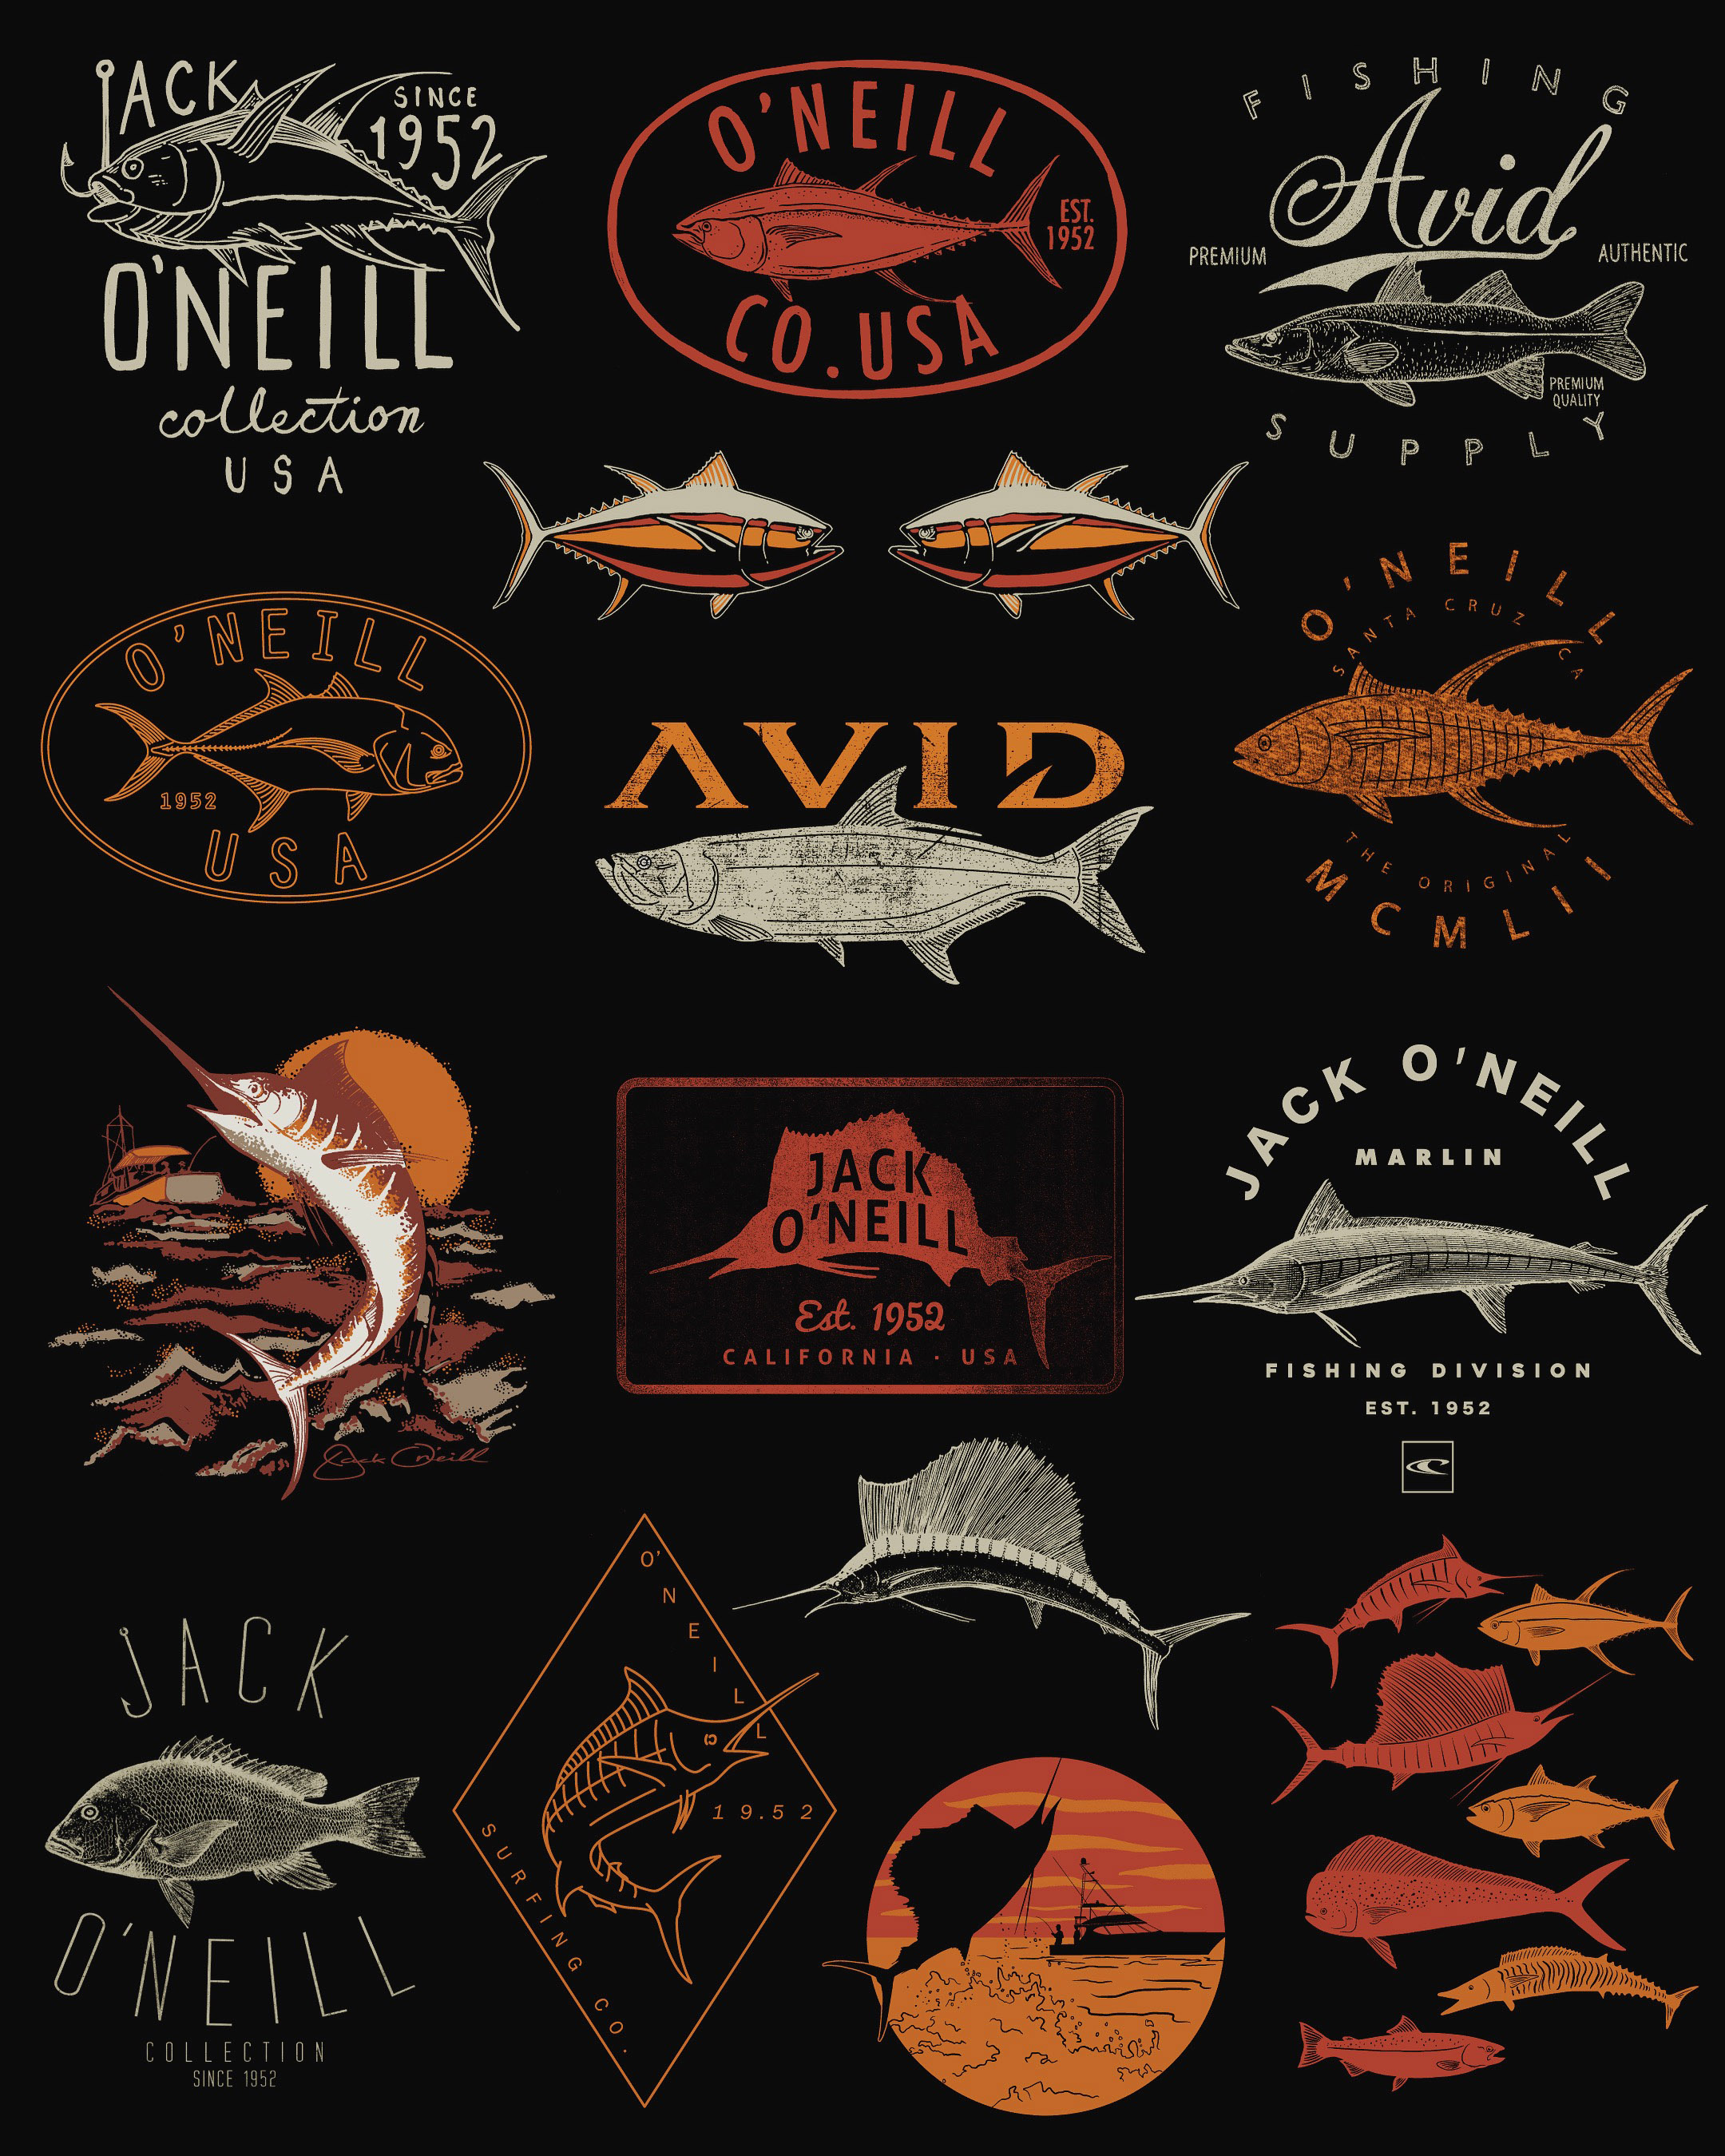
This template allows you to apply an instant Ink Stamp (or woodblock / linocut print) look to your designs in Photoshop.

Even if you aren't specifically looking for an ink stamp look, it's a great way to add some interest and texture to your designs.

Go here to see some examples of what you can do:

How Ink Stamp Automator Works:

1) Just paste in your Pixel or Vector design to the designated Smart Object layer.
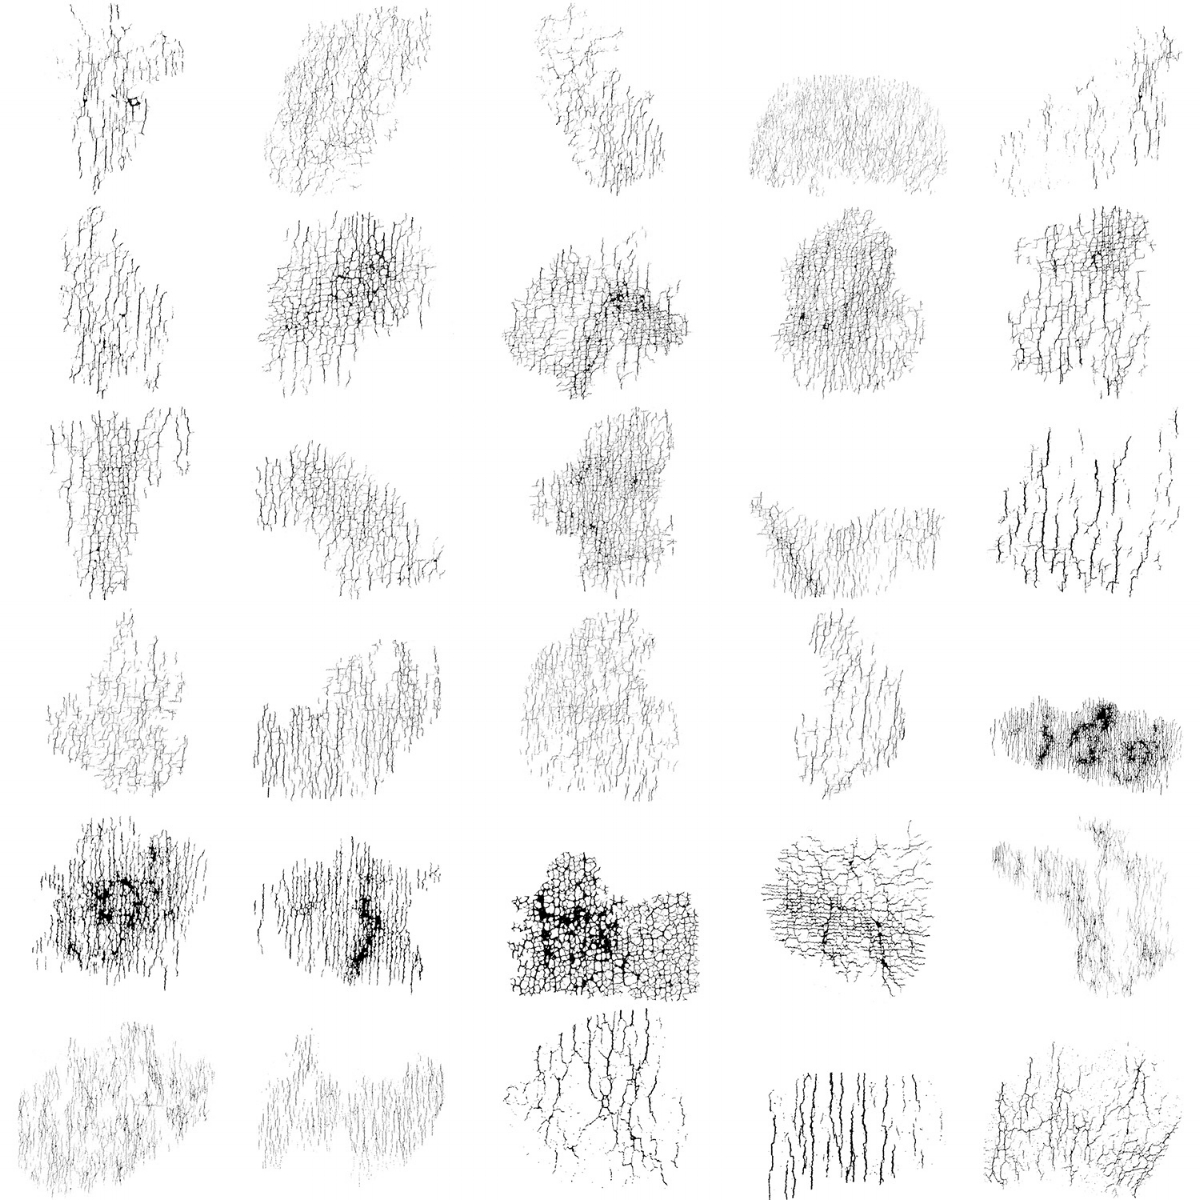
2) Choose from 42 different ink stamp textures, then you are done!
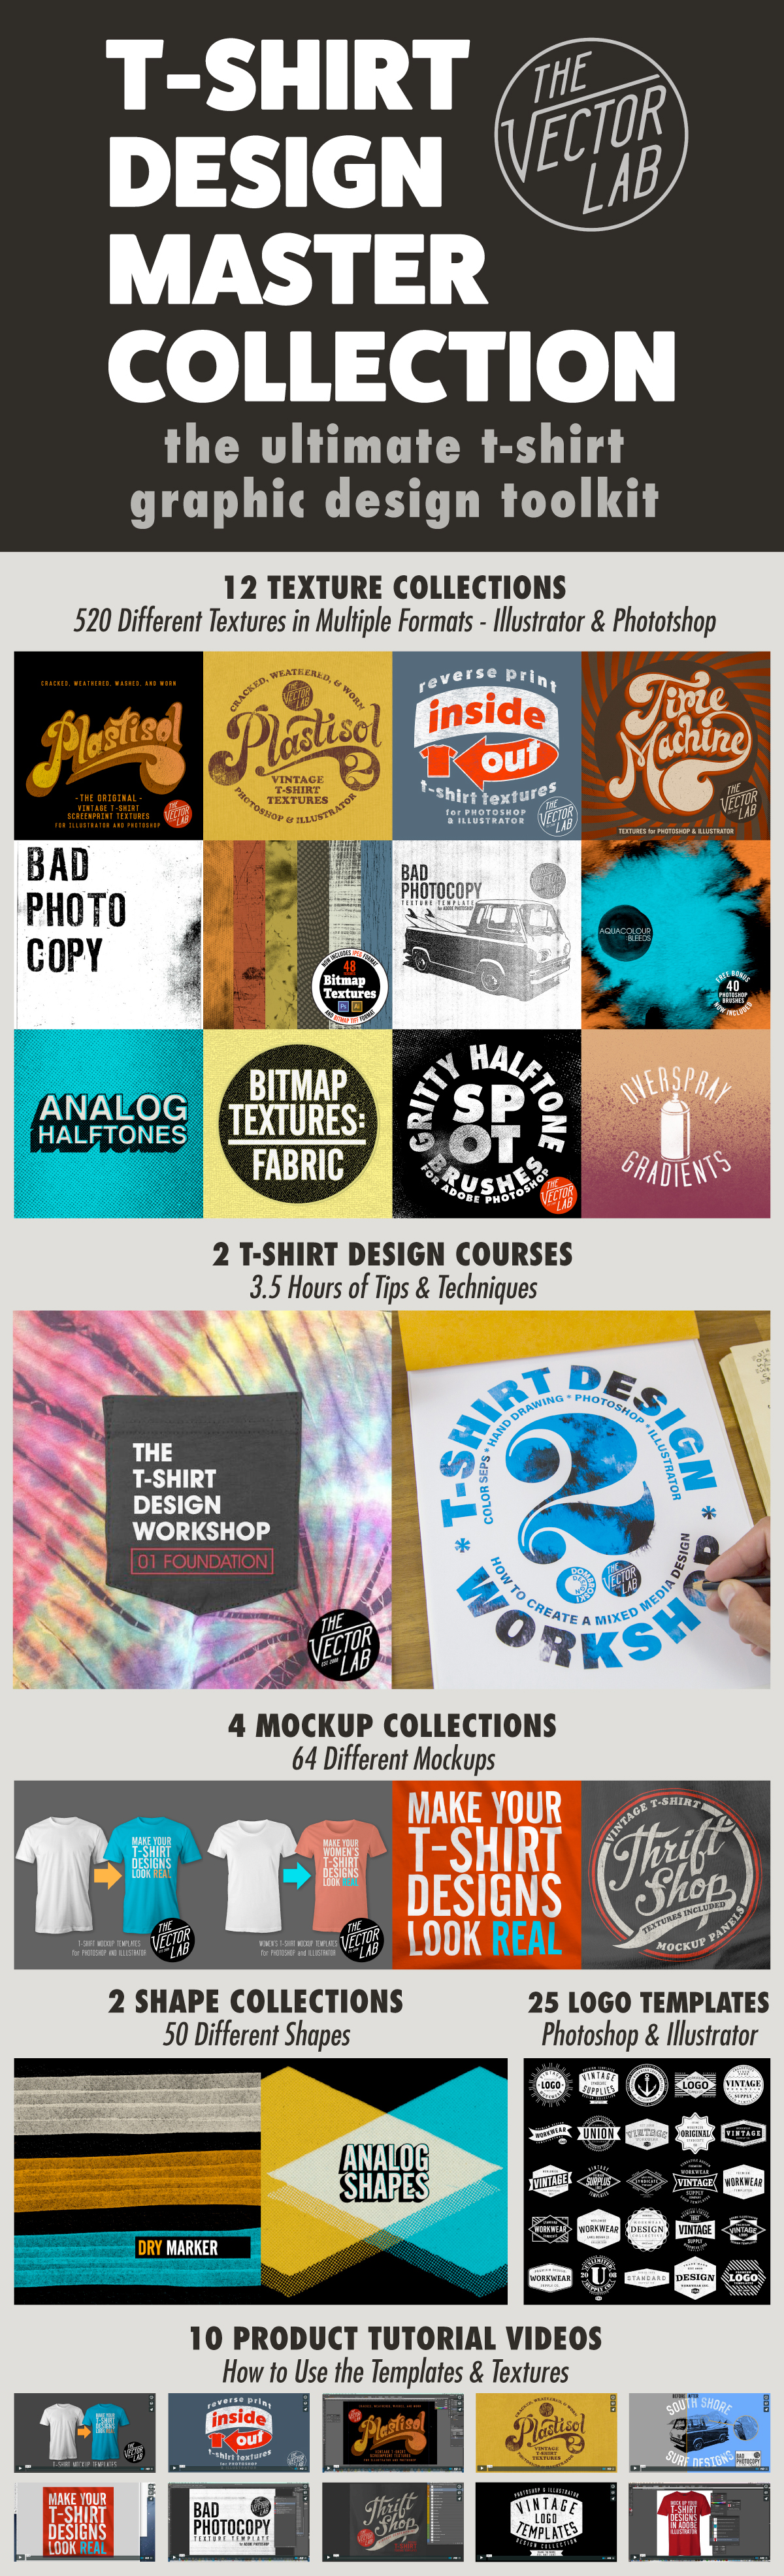
What's included:

  • The Ink Stamp Automator Photoshop PSD template (4000 x 4000 pixels). 42 built in textures.

  • Quick Start Guide PDF instructions.

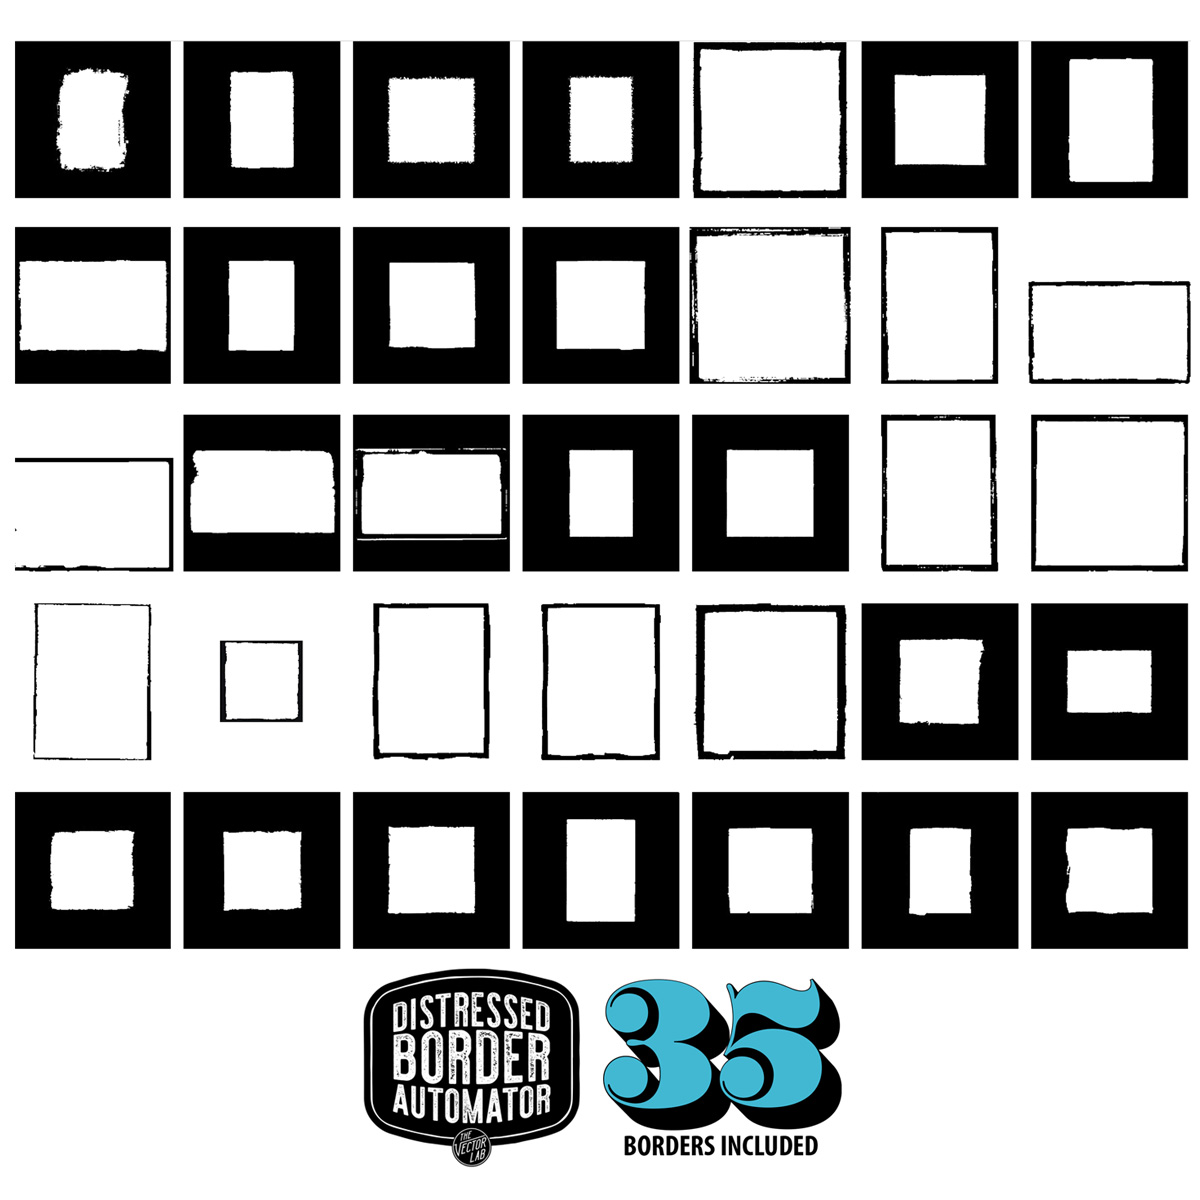
  • 9 Ink Stamp Shapes. These are ink stamp circles, squares, and rectangles that will help you create logo shapes (see video).

  • 42 stand alone ink stamp textures in LAYERED TIFF format (4000 x 4000 pixels). Perfect for power users who want to dig in and fine-tune the textures.

  • 42 stand alone ink stamp textures in BITMAP TIFF format (12,000 x 12,000 pixels). These are great for designers who want to use the textures in Adobe Illustrator.

Distressed Border Automator

When you are printing rectangular photos or illustrations onto t-shirts or posters, a crisp clean edge can be a bit too plain. 

With the Distressed Border Automator, you can quickly apply a transparent textured border to your t-shirt designs, poster designs, photos, and illustrations.

As shown in the video below, here's how it works:

  1. Paste your image into the Distressed Border Automator (Smart PSD Photoshop file).

  2. Choose from 24 transparent border designs.

  3. Or choose from 14 opaque border designs & apply any color to the border.

  4. Color your background or leave it transparent. Save or export your new image, then you are done!

This template is perfect for setting up your designs to be printed Direct To Garment (DTG) and Print-on-Demand with vendors like Merch by Amazon. As shown in the video below, just turn off the visibility of the background color layer. Export the file as a transparent PNG, and you are ready to send your design out for DTG printing!

Plastisol Cracked T-Shirt Ink Textures

Make your t-shirt designs look washed & worn with Plastisol Textures for Photoshop and Illustrator!

What is Plastisol, and what does it have to do with Vintage T-Shirts??

Plastisol Ink is a type of Screen Printing Ink that was first used to screen T-Shirts in the 1970's. When you look at Vintage Clothing, it's the ink that cracks and flakes over time as the t-shirt gets washed, stretched out, and worn to too many Def Leppard concerts.

Plastisol is why real Thrift Shop T-Shirts look Vintage!

How easy is it to add vintage texture to your own designs? Have a look at the tutorial videos.

  • PHOTOSHOP PSD: The most versatile format. Power users can easily go in and adjust the textures to their liking.

  • BITMAP TIFF: Use the "Opacity Mask" method (shown in the Plastisol 2 tutorial) to knock transparent texture through your raster & vector designs in Adobe Illustrator (yes Illustrator)!

  • PHOTOSHOP BRUSH: Super easy to use. Just double-click on the .abr file and these brushes will load into your Photoshop Brushes Palette. Select a brush, and click to paint in your vintage texture!

So what's the difference between Plastisol 1 and Plastisol 2?

The short answer is Plastisol 1 Textures are FASTER. Plastisol 2 Textures are highly CUSTOMIZABLE.

Recent Graphic Design Work

Various projects.

Crosshatch Pattern Brushes

I've been experimenting with some new Crosshatch Pattern Brushes for Photoshop CC. These are different than normal Photoshop brushes because they paint a seamless pattern, with no overlapping effect. Good for shading lettering, logos, and even illustrations.

You can use these brushes with a tablet or a mouse. But if you use a drawing tablet, you get control of your brush size with the pen pressure.

These brushes have only been tested in Photoshop CC. I don't plan to make them backwards compatible for older versions of Photoshop, but it's possible they may work in CS5 or CS6.

To download the brushes, sign up for my email newsletter. You will gat access to them as part of Graphic Design Launch Kit (More than 40 free downloads!)

T-Shirt Design Workshop 01 on SKILLSHARE

Great news: T-Shirt Design Workshop 01: Foundation is now on Skillshare!

About the Class: Learning the possibilities and options you have when creating a t-shirt design is an essential investment in becoming a professional t-shirt designer. In this workshop, we'll go over all the ingredients that go into a t-shirt design.

Here’s the thing: I need your help to get some “momentum” behind the course. The more upfront visibility it gets, the better chance it will rank higher on Skillshare and be seen by more people.

If you can help, I will send you a free Gift Card for $20 or $150, good for any new purchases on TheVectorLab! (details below)

Go here to enroll now in T-Shirt Design Workshop 01: Foundation on Skillshare!

Important: Here are the steps to follow to help me out and also get your free Gift Card for TheVectorLab.

  1. Enroll in the class and watch ALL the lectures (at regular 1x speed, not 2x speed - important for Skillshare metrics).
  2. Post a review (in your own words) when Skillshare prompts you to do so.
  3. Post your "Inspiration Board" project in the Project Section of the class. No rushing here - your project is public and should look neat & tidy and well thought-out (It’s simple - details on the project are on the course page)
  4. On or before January 27, 2017, send me screen shots of your 1) Completed Lectures (showing green check marks), 2) Review, and 3) Posted Project to ray{at}thevectorlab . com

On January 28, 2017 I will pick my favorite project and will send the winner a $150 gift card for TheVectorLab. Everyone else will receive a $20 gift card (to be delivered Jan 28). So if you put in a little effort there’s no way to miss out!

Download this Instruction Sheet to see an example of the screen shots needed so I can email you back a gift card.

All the best,

Ray Dombroski

P.S. I think you will love this workshop!

You can give your friends who are new to Skillshare 3 months of membership for $0.99 if you use this link: http://skl.sh/2ieuNq6

Free Vector T-Shirt Template + T-Shirt Design Workshop Preview

Today I have a free download of a vector t-shirt template for you!

This template includes full size (front & back) drawings of a men's large t-shirt, perfect for sizing your art for screen printing. There is also an area to specify ink colors. You can download the free vector t-shirt template here.

Preview from T-Shirt Design Workshop 2 {Lecture 24} showing how to set up your spec sheet in Adobe Illustrator:

If you are interested in designing t-shirts, have a look at my T-Shirt Design Workshop 2 - because you should never stop learning!

~Ray Dombroski

Holiday in the Islands

"Haole Days" Collection - a Hawaiian Christmas themed design for O'Neill clothing.

Here's the print for boardshorts and woven shirts:

A closeup view: Santa wrestling a shark.

Aloha shirt.

Boardshorts

Boardshorts

T-Shirt Design

Haole Days T-Shirt

Inside Out: Reverse Print T-Shirt Textures

Otherwise known as a "push through," a reverse print is when you flip a t-shirt inside out, and print on the inside of the shirt. Some of the ink shows through on the other side, and it results in a natural texture determined by the qualities of the fabric.

With "Inside Out" Reverse Print Textures, you can achieve the look of a real reverse screen print, without the headaches, ink thickness, and inconsistent results of traditional reverse printing.

What's included:

    17 Textures: 4000 x 4000 pixels (equal to 13.33" x 13.33" @ 300 pixels per inch)
    Every texture is in seamless repeat (tileable top-to-bottom and side-to-side), so you can use them to texture ANY size graphic.
    These textures can be inverted (see video), essentially giving you 34 texture options!

Each of the 17 textures comes in the following formats:

• Photoshop Brush. Just double click on the .abr file to automatically load the brushes into Photoshop!

• Photoshop PSD with transparent backgrounds. (These files also include a hidden flattened layer for advanced users who want to adjust the "levels" of the lights and darks.)

• Bitmap Tiff. These files are ideal for screen print production & color separations using Illustrator because they have no greyscale; only black or white pixels. When viewed in Illustrator, Bitmap Tiff files have automatic transparency and can easily be assigned any color.

Plastisol 2 Vintage T-Shirt Cracked Ink Textures

Make your t-shirt designs look vintage with “Plastisol 2” cracked ink textures.

Plastisol 2 textures have SUBTLE EDGES, giving designers precise control of where to place the textures onto graphics.

Plastisol Ink is a type of Screen Printing Ink that was first used to screen T-Shirts in the 1970's. When you look at Vintage Clothing, it's the ink that cracks and flakes over time as the t-shirt gets washed, stretched out, and worn to too many Def Leppard concerts.

Plastisol is why real Thrift Shop T-Shirts look Vintage!

These 30 SUBTLE EDGE textures were created from 600 DPI scans of real vintage t-shirt graphics. The smallest texture is 625 x 406 pixels and the largest texture is 3357 x 3374 pixels.

Each of the 30 textures comes in the following formats:

• Photoshop Brush. Just double click on the .abr file to automatically load the brushes into Photoshop! 

• Photoshop PSD with transparent backgrounds. (These files also include a hidden flattened layer for advanced users who want to adjust the "levels" of the lights and darks.)

• Bitmap Tiff. These files are ideal for screen print production & color separations using Illustrator because they have no greyscale; only black or white pixels. When viewed in Illustrator, Bitmap Tiff files have automatic transparency and can easily be assigned any color. 

Also included is the Free Bonus Fabric Mockup Panel + instructions mentioned in the video above.

3 ways to get Vintage Cracked Ink Texture for T-Shirt Graphics

As a t-shirt designer there are 3 ways to get a vintage cracked ink look for your graphics like this:


  1. Print a t-shirt. Repeatedly wash & wear the shirt for 10 years.
  2. Use a crackle ink to print your design. It's good to give it a wash before selling so that the cracks will become more visible.
  3. Use the "Plastisol" collection of Photoshop Brushes and Bitmap Textures to add a consistent & reliable vintage look to your designs.

--

You might enjoy the Plastisol Textures Collection because 10 years is a long time to wait for t-shirt ink.

T-Shirt Design for Pointer Brand and LC King

I recently had the opportunity to design a t-shirt for LC King, makers of Pointer Brand Clothing.

If you haven't heard about LC King and Pointer Brand, it's time for a closer look.

Founded in 1913 by Landon Clayton King, it is the oldest family owned & operated clothing factory in the USA. The factory in downtown Bristol, Tennessee has been in the hands of the King family for more than 100 years and four generations.

Here's the design for the back of the shirt:

Pointer Brand T-Shirt Design

And for the front of the shirt, it's a simplified version of the main design:

Pointer Brand Front Design

When I design t-shirt graphics, I almost always design a version for light fabric and a version for dark fabric. This helps the client visualize how the design will look.

It also helps me to pick ink colors. As well as foresee potential issues with screen printing.

If you examine these cads, you will notice how the dog art needed to be "flipped" so that it didn't have the "x-ray" effect. This can be a problem when printing one-color designs.

Here's the spec sheet for the design on white:

And here's the spec sheet for the design on black fabric:

They ended up printing the design on a black t-shirt (good choice!).

This tee is exclusive to the factory store in Bristol. It's not online. Go say hello and see the tradition / American made heritage / pride / workmanship for yourself.

Read more about LC King here.

--

If you are interested in designing t-shirts, have a look at my T-Shirt Design Workshop 2 - because you should never stop learning!

~Ray Dombroski


Free Textures over the Weekend

Hi there!

This past weekend, I sent out a free download of 15 Paper Textures for all subscribers to TheVectorLab's email newsletter.

If you missed the email, you can still get them as part of Graphic Design Launch Kit, by signing up for my newsletter.

A collection of 15 stained, crinkled, and distressed paper images. These are pixel-based (not vector) high resolution jpeg files: 2400 x 3500 pixels. Great for backgrounds. Use these by placing them in Photoshop or Illustrator as a multiply, screen, overlay, or darken layer on top of your design to create a natural distressed look.

If you want to convert these textures to Photoshop Brushes, it's easy:

Pivotal graphic in my design career

In 2005, I cold-pitched this design to Local Motion in Hawaii. They bought it, along with a few other graphics.

IMG_3867.JPG

All of a sudden, all my trips to Hawaii were business write-offs. This led to me doing more graphics for other Hawaiian surf companies like T&C and HIC.

Billabong hired me because they needed someone to help out with Hawaii and destination tees and in-line designs. Then this eventually led to doing work for O'Neill, as well as a lot of other designs I've made in the surf industry.

This graphic was made from a crappy snapshot of an old ford bronco that I spotted in Ala Moana Beach Park. I plan to do a design tutorial soon showing how to make t-shirt graphics using this method.

The thing I like about this design is it still looks fresh. How about a reissue? I still have the Illustrator file.

What do Whales in Tonga have to do with Graphic Design?

2016 so far has been the year of the WORKSHOP. I teach a few of them, myself (you can see the workshops here). But I also participate in other experts' workshops.

For instance, early this year, I went up to Portland Oregon to learn Hand Lettering and also Screen Printing from the guys at House Industries. House is a font foundry and design studio that has been putting out great stuff for more than two decades.

The most recent workshop I attended was a whale photography workshop hosted by Australian Nature Photographer, Craig Parry. I've been wanting to improve my photography skills for some time now. And the Kingdom of Tonga, with its yearly migration of humpback whales was the perfect place to hone those skills.

The whales can move quickly, so the added pressure of a moving target really helped cement the camera settings in my mind. It's all about anticipating and quickly adjusting the camera settings: F-Stop, Shutter Speed and ISO.

We shot everything in Manual mode. I learned from day one that if you try and shoot underwater in Automatic mode, your photograph will come out sub-par almost every time.

I use quite a bit of photography in my designs, so these new found skills will come in handy down the road. I'm hoping to sell some art prints, or perhaps turn some of these into t-shirt designs.

Tonga has the clearest, most deep blue water I've ever seen. A big plus for underwater photography.

The "over/under" or "split shot" is another water photography technique we worked on. This is one of the many small islands in the Vava'u group.

A curious baby humpback approaches (and dwarfs) one of the photographers who participated in the workshop.

A palm tree-filled beach in Vava'u, Tonga. This might make a good t-shirt design!

45 feet in length. 80,000 pounds. Humpback whales are some of the most gentle creatures you can witness in the wild.

Follow along to see more photos and graphic designs in my Instagram feed:

How to present your t-shirt designs just like the big apparel brands

Have you ever stopped to notice how big apparel brands like Nike, Topman, and Quiksilver display t-shirts and apparel on their websites and in their catalogs?

Often they are photographed on a mannequin with great studio lighting.

The studio background, along with the mannequin neck and arms have been erased from the image. The inside portion of the collar and neck label have been Photoshopped into the image to complete the look of the shirt.

This kind of image emphasizes the graphic design, fabric color, and shape of the garment itself.

If displaying apparel in this manner is being done by these big companies, then there must be a reason. Right?

Perhaps they have discovered that this is the most effective way to appeal to their customers.

I have always been of the opinion that the better the PRESENTATION of your designs, the higher likelihood you will increase your sales.

This is why my apparel templates have been photographed in a similar way. On mannequins in a studio with proper lighting.

In addition, the templates have been set up with the ability to easily:

  • Add in your graphic
  • Change the fabric to any color
  • Warp your graphics to match the shape of the shirt wrinkles for extra realism (Photoshop only)
  • Mock up front views and back views
  • Add in your own custom neck label design
  • Use with Photoshop and Illustrator
  • Crop the edges of oversize graphics to the shape of the shirt
  • Choose regular cotton or heather texture (like poly-cotton or tri-blend fabric)
  • Display over any background image or color (the backgrounds are transparent)
  • Add in a pocket (select templates)


If you are a graphic designer or have a business that sells t-shirts, I believe that my mockup templates are the fastest, easiest, and best looking way to make your designs look real. Just as if your designs were photographed in a studio with professional cameras and lighting.

Now you can get ALL of my men's mannequin-style mockup templates in one brand new bundle, for more than 50% off!

This includes all 113 mockup templates for:

  • men's short sleeve tees
  • v-necks
  • tank tops
  • zip & pullover hoodies
  • crew neck sweatshirts
  • long sleeve thermals
  • polos
  • raglan baseball shirts
  • long sleeve tees

Each style of shirt in this bundle has multiple images, photographed with the same camera angle and lighting so they look consistent on a page. But each one has a slightly different shape so it's not apparent that they are mockups.